Showing posts with label DIY. Show all posts

Saturday, 20 July 2013

DIY – Ice Cream Matching Colours

 20130720_211057

A simple and easy made game for kids, matching the ice cream felts with the colourful sticks.

What we need ?

A simple but fun for kids while learning colours.

20130720_211336

Items needed:

1. Different colours of felts

2. Different colours of ice cream sticks or craft sticks (colours should be  able to match with the felts you have)

3. Needle and threads

How to make ?

20130720_210534

Firstly, cut the felts into ice cream shape as above. Have two same colours of felts for one ice cream.

20130720_210748

Sew the same colour felts together.

…. and now is all DONE !

And now is ready for play ..

File Folder Game – Ice Cream Colour Matching (Letter I Week)


20130712_092818

A lovely and fun playing file folder game where kids learn colours by matching the ice cream scoops and ice lollies with the correct cone or sticks, in terms of colours matching and words recognition. This lovely template was download from Mr Printable website.

The little pocket on the front cover can be used to store the scoops and lollies. 

20130712_092828 

20130712_093123

20130712_160438

To make it more solid and durable, I use foam paper as ice cream scoops and lollies instead from the printout. The colours look brighter with foam papers too.

I love this file folder game and so as Debo. It looks like an ice cream selling store, attractive and fun playing while kids can learn and keep them busy… at least for some moment.

Tuesday, 2 July 2013

DIY – Farm Barn

20130628_164919

Found this lovely printout from wondertime.com, however the website now seems being redirected to one of the Disney website.

20130628_164155

I had use one of Debo toy’s box that has some transparent part, showing inside of the barn. Pasted the printout inside the box as the background of the barn and putting inside some brown paper strips as straws.  I used brown mahjong paper as the roof of the barn, cutting the end of the paper making it looked like roof covered by straws.

20130628_163930

Inside the barn with some paper strips.

20130627_115950

This was the side of the barn. I used a cardboard as the “staircase” for animals to enter into the barn.

To see how the sensory bin looks like? Visit the following post -- Sensory Bin – Farm Animals.

Wednesday, 19 June 2013

Busy Bag – Clothesline Play

  20130617_153851

Another easy made busy bag – Clothesline Play. This is a fine motor skills game to train kids in using clothespin and hanging clothes. I am very wish that Debo can help me do all the house works including hang clothes, but seems need to wait for few more years… too short for her now.

Ok, the materials needed are simple:

  • Felts or fabrics pieces (or even can use doll’s clothes)
  • Clothespins
  • String

How to make it?

  1. Cut the felts or fabrics in clothing shapes, you may download the clothing patterns from here.20130617_153733

Just one step and is all done. Tie the string and have your little one start playing it~ Is really fun … at least I am enjoying playing it too ^_^

Tuesday, 18 June 2013

DIY – Sandpaper Letters


Sandpaper letters is one of the common materials in Montessori teaching. It is a useful way to teach children in learning the letters both in way of writing and reading the letters, through multi-sensory approach. The children will HEAR the sound of the letter, SEE the card of the letter, and FEEL the letter by tracing on it with their fingers.

In Montessori, letters are introduced in phonetic sounds instead of the “name” of the letter, example for: Letter C, it is introduced as “KA…”. There are proper ways of teaching sandpaper letters in Montessori approach, however I have not fully studying the approach and since Debo is still young, so I will just use part of the methods in teaching.

Purpose of using Sandpaper Letters:
  • Used to teach children the correct way of writing and shapes of letters by tracing the sandpapers
  • Identify and learn the sounds of the letters in graphic form
Materials required:
  1. Alphabets printouts – you may get free template here or if want to have my template can download it from my TPT store. For non-member, you need to sign up first before download it.  Joining member is absolutely free, just click HERE to sign up.
  2. Cardboard/ cardstock – remember in Montessori rule, Vowel in blue and consonant in red colour
  3. Sandpapers – I used about two pieces for one set of letters

Methods of doing it:
  1. Print out the templates
  2. I cut out the alphabets in rough way and put on the top of sandpaper, cut the alphabets nicely together. So, I have both sandpaper and colour paper alphabets together. Well, just thought that I can use the colour alphabets for later use, maybe in letter box or to decorate the lapbook.
 IMG-20130127-00281IMG-20130127-00282

3.   Cut out the blue and red colour cardboard. I cut it into about 5.5 inch X 4 inch size.
IMG-20130122-00267

4.   Glue the sandpaper on the cardboard. Make sure you place at a standard position, so that each letters had the same position on the card. I used an used envelope to position the sandpaper by cutting the middle and right top part of the envelope, make it as L shape, then put the cardboard inside the envelope and glue the sandpaper on it.

I had make three sets: Capital Letters, Small Letters and Numbers. Here are the final products:

20130611_183919

20130611_184158 
20130611_184338

You can buy the ready products in some shops or online, but the price is a bit high. It is much cheaper (less than RM 10 for one set of letters) to make it yourself and not difficult to do it, just time consuming in cutting out the letters.

USL Education in Kajang and Subang Jaya selling at RM 190 online.
Sandpaper Lowecase Letters
or Amazon at $34.99 (postage not included)

Saturday, 15 June 2013

Busy Bag – Button Snake

20130616_231506

Button snake is a fun way for our little one to learn “buttoning” while building up their fine motor skills. This is easy to make and fun to play. Here are the materials needed:

  • Button (is possible, choose a big button)
  • Felts
  • Ribbon

How to make this?

20130616_232406

First, cut some coloured felts into square or any shapes as you like. Make a slit in the center of the felt as the “button hole”.

20130616_232601

Then, sew the button on the end of the ribbon. I had sew the other end of the ribbon to make it as a bracelet, so that my kid can put her hands in to play around after “buttoning” all the felts.

That’s all, simple and easy. It may not easy for the little one to pass the button through the hole for the beginning, after trying few times, they can easily get the tricks in doing so.

Happy Trying ~

Saturday, 25 May 2013

DIY – Market Place


I found this printout from HomeschoolShare. I just printed out the last few pages to make a market place for Debo to “get” ingredients for her restaurant pretend play. We had few shops in our market place: Bakery shop, Market shop, Florist shop, Sweet Ice cream shop, Bookstore, and shop selling hats.

20130525_002523

Materials needed:
  1. Brown colour mahjong paper
  2. Empty boxes, can also use bags or cardboard that can make it stand alone
  3. Printout of the shops

Step by step:

  1. Print out the colourful shops and cut accordingly.
20130525_002354
2.   Paste the mahjong paper over the empty box. I was using Debo snack box, so had to put cover it to make it look more like a “building”
20130525_002411

3.     Glue the printout on the box, fold the “roof” nicely to make it look more 3D.
20130525_002453

Friday, 24 May 2013

DIY – Ovals Wheel


As for the week of Letter E , egg is the object of the week and since we  had learnt about shapes few weeks ago, so I decided to put in the shape of the egg – OVAL shape in our lesson this week.
20130525_002746
Materials we need:
  1. Cardboard
  2. Oval shape printout (I get it here..page 21). For the oval objects, I had print some objects that usually can be found around Debo from Google.

Step by step:
  1. Print and cut the cardboard and cover wheel in round shape.
  2. Cut out the extra area on the cover wheel where indicated on the printout.20130525_002753
  3. Paste the objects on the cardboard in sequence. 
  4. Write the name of the objects at the top of the objects.20130525_002930
  5. Attach cover wheel together with cardboard using a brass fastener (I using paper as holder… don’t have brass fastener)

Friday, 3 May 2013

Interesting Paper toys Websites


Recently browse around looking for some materials for teaching geography, and found some interesting website that provide free printable of paper toys.
image (sample of paper toy -  Eiffel Tower from papertoys.com)
Resource: http://papertoys.com/

There are many different paper toys printable, easy and fun for craft work materials for children, useful in illustrating the objects we teach. It is not just free, but also simple making: just Print, Cut, Fold and Glue… It also provide facts about some of the printable objects at the bottom of the page.

I will keep these paper toys printable for later use, in geography lesson… hope she will like it ^_^

Another interesting website, The Ginghams Paper Doll Book
image
These recall my lovely childhood memory…I love playing paper doll and I guess lots of girls do like paper doll too… changing beautiful dress and hats for the lovely little paper girl doll…haha….

You can make some paper toys for your children, but required a lots of time and patience in preparing, especially cutting out…I WILL TRY my best… hopefully i do have the patience ~_~

Monday, 22 April 2013

Special Theme Week – The Very Hungry Caterpillar

IMG-20130415-01340

I made a caterpillar wall collage for decoration and words learning for Baby Debo. You can find the way I made this collage here in my blog. I will keep and use these alphabets later for other theme and in my alphabets box.

IMG-20130416-01354

Main material we need – Book of “The Very Hungry Caterpillar”, with her caterpillar toy. We read and go through the story book together on the first day of the theme.

IMG-20130415-01325 IMG-20130416-01355

On the second day, I read the story again but this time I was using some cards which I downloaded from here, to illustrate the story. I also made a sun and moon by using foam paper to illustrate morning and night..she likes it, especially the moon… I can’t find the moon after the activity, I guess she had kept in somewhere for herself @_@ I also used the fruits cards to teach her quantity …but she tend to eat the cards rather than counting it (she bite the orange cards) ….

IMG-20130415-01323 IMG-20130419-01436

IMG-20130415-01320IMG-20130419-01438

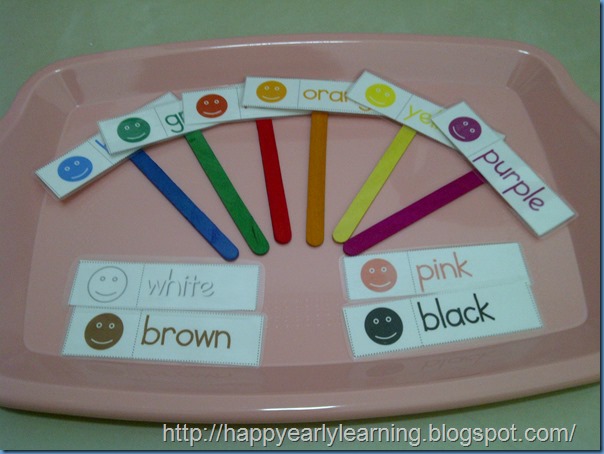
We had mini Chinese colours flash cards matching with the colour sticks plus colourful poms poms too. I had prepared a clip for her to clip the pom pom out from the box, but she insisted to use her hand to do it. She can do it pretty well in sorting pom poms into the box.

IMG-20130419-01457  IMG-20130419-01459

After colour matching, I had stick the card on the IKEA white board together with the colourful sticks by using TACK IT, for Baby Debo to do some revision. I think I will just stick it here for some period, so we can use these colours cards for our weekly theme.

IMG-20130419-01419
Resource: 1plus1plus1equals1 website 

Nomenclature cards of the main objects in the story. I stick the cards on the white board after showing her few times and playing cards matching. She able to recognize few pictures: orange, apple, butterfly, ice-cream cone (her favourite), pear, sausage, and leaf..she can’t recognize the caterpillar picture but pointed the caterpillar collage on the wall when I called and showed her the words “caterpillar”….
IMG-20130415-01326
Resource: 1plus1plus1equals1 website 

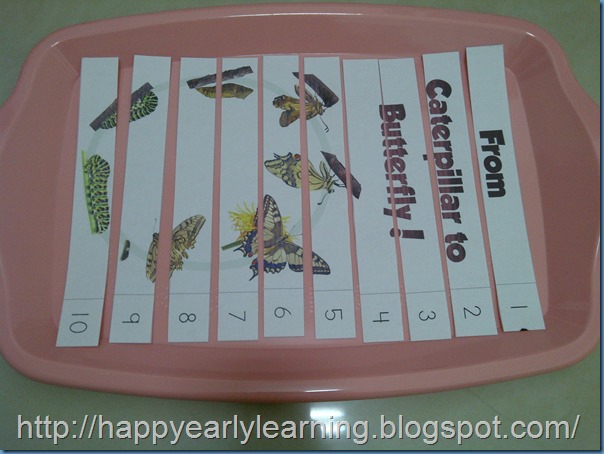
I paste these puzzle pieces on a colour paper and Baby Debo in charged of gluing it before passing to me. I explained the life cycle of a caterpillar to a butterfly, as what happened to the caterpillar in the story book. This is an interesting and useful material, thanks to the 1plus1plus1equals1 .

IMG-20130415-01331 IMG-20130419-01454

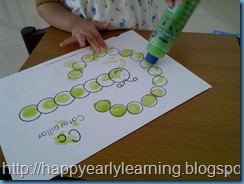
Our first try of DIY dot paint on Caterpillar worksheet. Baby Debo did pretty well, and able to chop on the circle by her own. Dot paint works enable the children to practice fine motor skills, one to one correspondence skills, hand-eye coordination skills, and identify the way of writing the alphabets letters. 
IMG-20130420-01460 Resource: Confessionsofahomeschooler
Her final work of dot paint… no bad ya, she was quite enjoying playing with the dot paint
IMG-20130415-01334IMG-20130421-01472
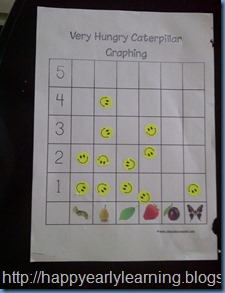
Resource: 1plus1plus1equals1 website 

Dice game of The Very Hungry Caterpillar. I gave her a smiling face stickers to stick on the graphing paper after she threw the dice. She did like this game initially but ran away before we reached the number five.

PHYSICAL PRACTISE
IMG-20130415-01317 IMG-20130415-01319 IMG-20130416-01357
Resource: Confessionsofahomeschooler website

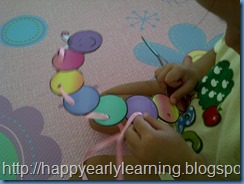
Lacing a colourful letter C caterpillar. I printed out, pasted it on a cardboard, cut it out and punched hole on each circle. I also made a thread,using an unused ribbon from a gift box. She loved this game especially the ribbon, walking around with the ribbon on her neck.. ^_^

Open & Close Basket

Open and Close basket, to develop Baby Deb’s fine motor skills. I tried to get different size of containers and bags with different way to open: pulling out, twisting, zip, pulling thread, and button.

COLOURING
IMG-20130420-01467

Thought of giving her a try on Mandala colouring, the simplest two colours worksheet…. How was she doing? Well, as seen as the drawing beside… She still not yet ready for the Mandala, will let her do it again after she know how to ‘COLOURING”. Since then, I will let her practise the way of using crayon before doing the Mandala again, using the Kumon colouring book.
IMG-20130416-01350

I really like the Kumon books, especially this colouring book. It teach children colouring step by step, started with scribbling. I just can’t wait to let Baby Debo to use this book, and here is it… her first lesson…Breakfast Time !! She was just SCRIBBLING all over but a good try for her.

SONG
IMG-20130419-01398 These
two books were gifts from my sister-in-law, comes with CDs. We played some Letter Cs and caterpillar songs from Youtube, and also these two new CDs…very lovely songs.

From Youtube: Hungry Songs
https://www.youtube.com/watch?v=_-gNaNOWdg8
Related Posts Plugin for WordPress, Blogger...